Before we dig into this subject if you want quality gear and like our work, please support us by buying over our store!
Today we’ll show to transform your 3M PELTOR ComTac XPI with a headband setup towards a helmet-mounted setup.
WHY GET A PELTOR COMTAC WITH A HEADBAND?

So why do you want to get your PELTOR ComTac XPI with a headband in the first place? Well, there are 3 main options when ordering one. The first one is a neck band, the second one is a set of helmet mounts and the third one is a headband like shown in the photo.
As a matter of fact, some of these options come with difficulties. For example, the neckband obstructs your movements with your neck especially when looking up which is already a problem.
The helmet mount set, on the other hand, only allows you to use it with a helmet and besides that the helmet mount set only fits a particular rail system for a certain type of helmet (ARC rail type). In our case for example, we use the Team Wendy helmets and those have their own unique rail system. So those mounts won’t fit that and you need to get another set to make it fit.
So in our opinion still the best option to go for with your ComTac XPI is a headband.
USING A PELTOR COMTAC UNDERNEATH A HELMET
Yes, there is the option of wearing the headband version underneath your helmet system since they’re designed for that. But this also gives some difficulties with it as well, because first of all the headband kind of obstructs you when wearing a helmet. Also when using a microphone like we do, you have a hard time of getting that thing through the retention system. By the way, when carrying the set up like this for several hours you will create some pressure points on your head which are not that comfortable.
So in our experience still the best way to combine your ComTac XPI with a helmet is to use helmet mounts.
REQUIREMENTS TO MOUNT A PELTOR COMTAC ONTO A HELMET
In order to mount your COMTAC XPI onto your helmet you will need a few requirements first and be aware of some things.
1. HELMET MOUNT KIT

The first thing is that you will need is a set of helmet mounts specifically made for the ComTac XPI and your specific helmet rail system. In our case that’s the Team Wendy rail system and these are made for that. By the way these are the quick-release system so they’re easy to put on or off.
If you’re in search for any of these products you can find them here:
2. THE SACRIFICE

Do notice when going over to that helmet mounted setup you will need to sacrifice one piece of your COMTAC XPI. This is the leather wrap, because you need to clear the cable going from the left ear towards the right ear and for that you need to cut it out.

Now, do not worry! Because there are third parties that sell new wraps for you to easily change between a helmet setup and a headband setup. So you can still use the headband as well. We also sell a couple of versions of such wraps.
Obviously, in order to cut the wrap you will need a pair of scissors. So let’s go over to how to do it.
HOW TO TRANSFER A PELTOR COMTAC ONTO A HELMET
STEP 1:

Step 1 requires you to remove the leather wrap going around the headband by cutting it out. Be warned that you save the rubber rings going around the frame and the cable in order to make use of them once you go back from that helmet setup towards a headband setup.
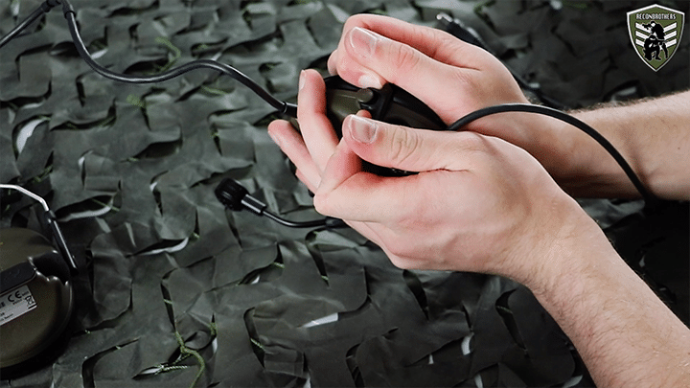
STEP 2:

As for step 2 you need to loosen the steel pins that are connected with the clips onto the ears, for this you need to pull which requires some force in order to get them off.
STEP 3:

For step 3 you want to remove the clips of the steel pins from the helmet mounts and place your helmet mounts onto the clips of the ear pads.
STEP 4:

Step 4 requires you to choose a placement of the wire going from the left ear to the right ear, here you have a few options. You can either put it inside the helmet underneath the padding so it doesn’t interfere. Or you can put it outside on top or on the back, but it is recommended to have a helmet cover for that so you can conceal it (to prevent snag hazards). As an example, we place the wire inside the helmet as shown in the photo.
STEP 5:

As for the 5th and final step you are going to mount your ComTac ears on your helmet.
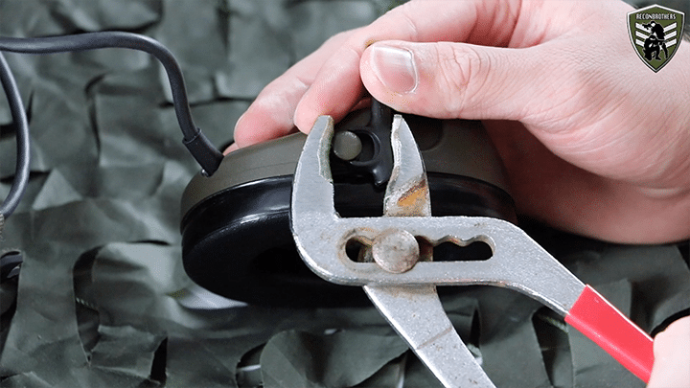
REPLACING THE CLIPS ON TO THE EARPADS
It might be possible in the future, for whatever reason, that you need to replace the clips that are mounted to the ears. For example you want to add a microphone or something. Now, removing them is quite easy you just need to turn them 90 degrees and you can pull them straight off. But mounting them not so much, for this the golden tip is to use a wrench to put them back on. Important is to also do this under the 90 degree angle!
THANKS FOR READING!
Hopefully this blog was helpful for you. If you’re looking for these sort of products, accessories and much more cool stuff make sure to visit our webshop.